When people think of image processing, it tends to be scary. But image processing doesn’t have to be as scary as it sounds. In this tutorial, we will be learning filter an image for an object based on color using Python 3.5.2 and OpenCV 3.2.0. We will also need to install NumPy for faster computation.
How does color work on a computer?
Colors on a computer are represented in what is called a color-space. Color-space is also known as color models, which describes the range of colors as tuples of numbers. We won’t go over every color-space but we will focus on two main ones, BGR (Blue, Green, Red) and HSV (Hue, Saturation, Value).
In a BGR color-space, there are three parameters Blue, Green and Red. Each of these values typically goes from 0-255. For example, if we were to show a pure green pixel on-screen, then the B value would be 0, the G value would be 255, and the R value would be 0. This makes sense as there are no blue or red in a pure green pixel. Also the order you put these number in makes a difference. B is always first, then G, then R.
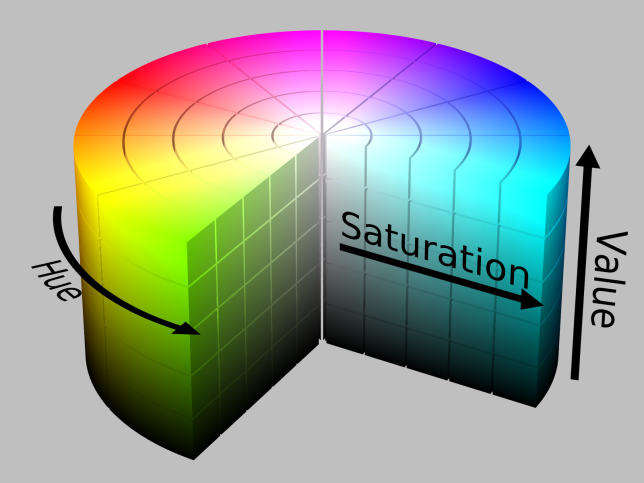
However, in HSV color space, the three parameters are Hue, Saturation, and Value. In simplest term Hue is the color, Saturation is how intense the color is and Value is the brightness of the color. The cylinder below shows it graphically.
Detecting the right color
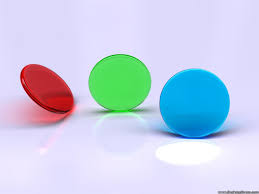
First, download this image since this is what we will be working with
Now that we got colors out of the way, we can start the fun part. Open your favorite text editor and let’s get started.
import cv2
import numpy as np
import imutils

img = cv2.imread('image.jpg')
The first two lines here handle all the imports. I am using imutils which includes lots of convenience functions such as resizing images and finding the range of colors which you’ll see to be useful. Line 4 opens the image. Note that there are additional optional parameters you can input for loading the image in black and white. You can read more on it here.
hsv = cv2.cvtColor(img, cv2.COLOR_BGR2HSV)
Now we convert the image to an hsv image because hsv is one of the color-space that differentiate intensity from color.
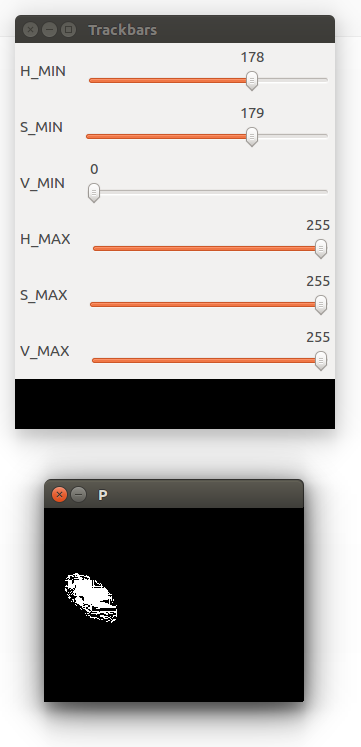
lower_range = np.array([178, 179, 0])
upper_range = np.array([255, 255, 255])
Here we define the upper and lower limit of the green we want to detect. To find these limit we can use the range-detector script in the imutils library. We put these values into a NumPy array.
mask = cv2.inRange(hsv, lower_range, upper_range)
Here we are actually creating a mask with the specified green. A mask is simply a specific part of the image. In this case, we are checking through the hsv image, and checking for colors that are between the lower-range and upper-range. The areas that match will an image set to the mask variable.
cv2.imshow('image', img)
cv2.imshow('mask', mask)

while(True):
k = cv2.waitKey(5) & 0xFF
if k == 27:
break

cv2.destroyAllWindows()
Finally, we can show the original and mask image side by side to see the difference. If you want to understand what 0xFF means in the code read this. The code then waits for the user to hit the ‘Esc’ button which will quit it and destroy all the windows to cleanup.
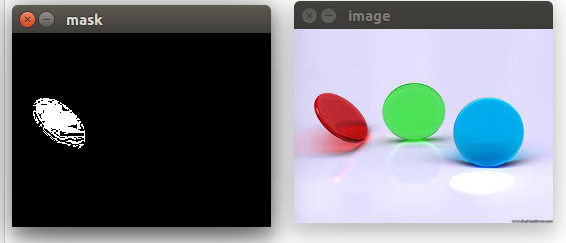
Notice how there is still black spots in the mask. This is noise that we would want to remove but for now we will just leave it. In the future, I will show you how we would get rid of the black spots.
